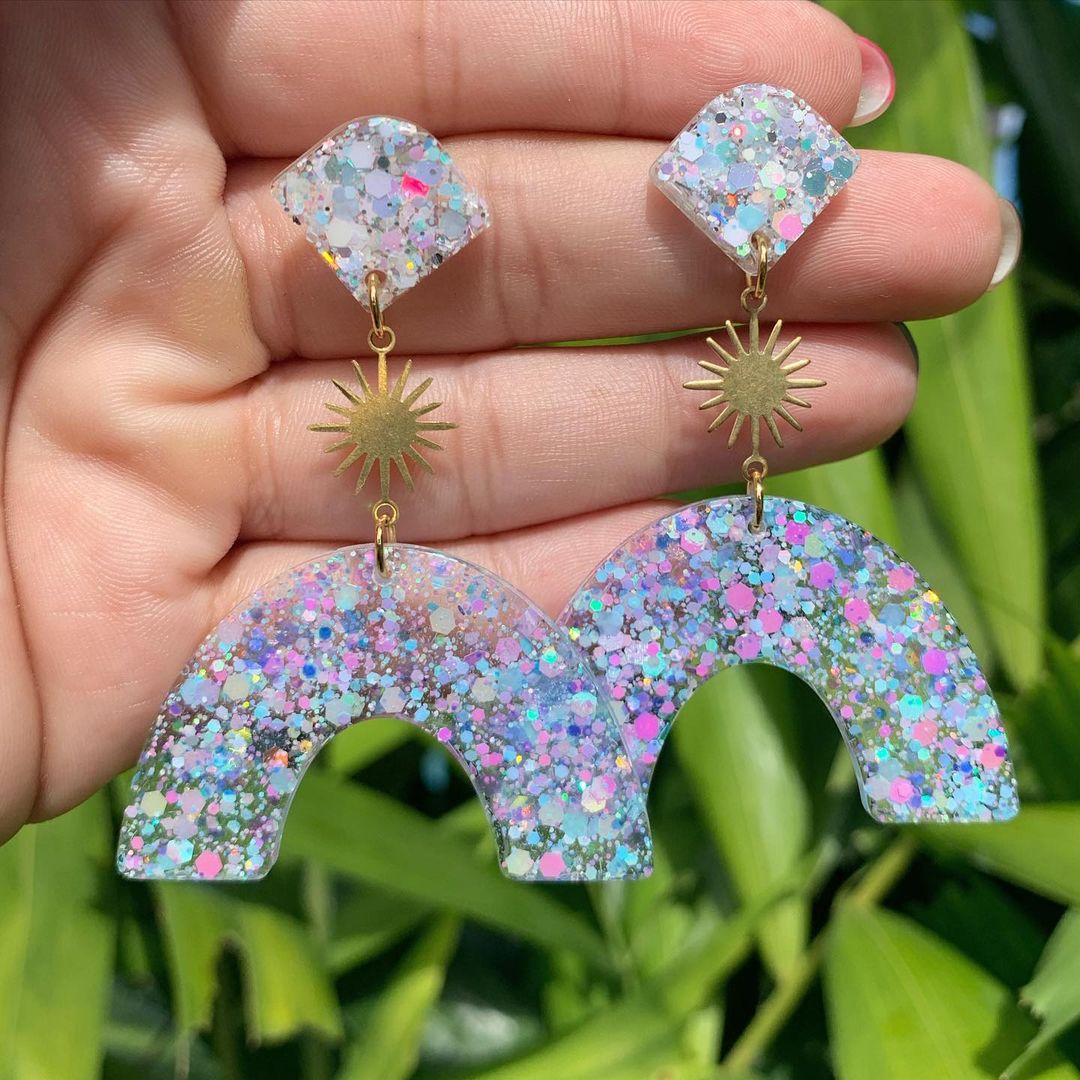
For all you magpies out there who are drawn to pretty sparkling things and want to pick up a new coffee table DIY project, learning to make resin jewelry is an awesome way of keeping your hands busy, your mind engaged, and gifts you one of a kind handmade jewelry that is sure to look awesome.
Epoxy resin art is a great beginner way to get into making jewelry. Working with resin may be a little messy at times and may sound complicated at first, but with these easy instructions and a bunch of inspiring ideas, you can feed your resin obsession and make everything from resin statement rings to resin pendants, a beautiful resin bracelet, and dangly flower resin earrings. Did we also mention that with resin jewelry you can go wild when it comes to decoration? From flashes of sterling silver to dried flowers, nail polish paintings, and glitter - epoxy resin jewelry lets your own style shine. Take a look as we map out exactly how to perfect the art of resin jewelry making.
How to Make Resin Jewelry: A Step-By-Step Guide

Clear yourself a workspace, grab a pair of rubber gloves and a silicone mold and get creative as you start out on your journey to create beautiful and bright handmade resin jewelry. Take a glance at our step-by-step guide and learn how to make DIY resin projects that don't just look super cute but capture your own individual personality and come with the pride of being beautifully homemade too.
You will need:
- Silicone resin mold (open bezels are best so you don't have to worry about the resin jewelry mold release)
- Epoxy resin set (you can find these in craft stores)
- Needle nose pliers
- Gloves
- Crazy glue
- Jewelry hardware pieces
- Decorative craft items like dried flower pieces, feathers, glitter, sprinkles or whatever you want to adorn your jewelry.
How to get going:
Step 1: Pick your molds.
You need to decide if you are going to make a resin necklace, some style earrings, or whatever resin pieces are calling your name. This will determine how you prep your molds and what jewelry hardware (like eye pins or backings or fasteners) you will need.
Step 2: Mix your epoxy resin.
Check out the instructions on your resin kit. You can use your own spoons and measuring cups or even a cough syrup or medicine cup to keep your measurements even. Usually, you use around one part resin with one part hardener for one or two pieces but do be sure to check the package instructions and follow to a tee. When mixed together you don't have long to work with the epoxy so make sure all your stuff is lined up and ready to go. If you want colored resin, this is the time to add your pigments or you can keep working with clear resin and add the color later via varnish.
Step 3: Pour and decorate
Pour a layer of resin into your jewelry molds and then get to work with your decorations. This is when you will add your pressed flowers, butterfly wings, or whatever else you are adding to your handmade jewelry resin design. Pour another layer if needed. If you want a sparkly finish you can glitter on top when your molds are finished.
Step 4: Remove the bubbles
Next, to get the bubbles out of resin you should use a blow-dryer or a blowtorch. Gently apply heat to the top of the pieces but be careful not to apply too much heat. As you apply heat you will see air bubbles rising to the surface. Wait a moment and then apply more heat and keep repeating until you have as many of the bubbles out as possible. Your goal is to remove as many resin bubbles as you can.
Step 5: Let it harden.
Let the molds harden overnight and stash somewhere safe and free from dust. If you notice that your resin hasn't quite hardened enough you can speed up the process by placing in the freezer for a few minutes.
Step 6: Turn into jewelry
After you have popped your resin jewelry out the mold, you can then add in the clasps or loops if making a resin pendant or bracelet. Simply bend a pin into a loop and hold in place with the needle-nose pliers. Heat it up using a candle or gas stove so it is hot enough to penetrate the resin. You should do this a day after you have let the resin molds set as any longer and the resin mixture will be too hard. If you are making rings you can simply use adhesive to add the back.
Step 7: Let your imagination run wild.
Now you have your own gorgeous epoxy jewelry piece that is sure to dazzle. If you are selling on Etsy handmade jewelry or giving your resin jewelry as a gift you can buy some pretty card and back your jewelry onto it. The skies the limit now you know how - we are sure you are going to go wild and find a new obsession casting butterfly wings in resin or coming up with an amazing seashore resin jewelry idea or keeping it art deco dreamy with black and white resin pieces that are so en vogue.
What can I put in resin jewelry?
When it comes to resin jewelry ideas there really are no limits. You can play with color, style, and materials to truly make your resin piece your own. Here is an easy start list on all the things you can add to your resin jewelry designs:
- Glitter
- Sprinkles
- Candy
- Metal Leaf
- Dried Flowers
- Sand
- Beads
- Colored and patterned paper
How do you make resin jewelry without mold?
You can make resin jewelry without a mold as resin clay is super versatile and easy to shape. However, you will still need something to hold the resin in place, maybe a pre-made bezel or you can even make your own silicone resin molds that fit any kind of shape your mind can dream up.
15 Resin Jewelry Ideas For Your Newest Obsession
If you are looking for some inspiration for your resin crafts, check out these ideas on Instagram. From flower earrings to shell earrings, gorgeous designs for your vintage on-trend clothes, and pink flowers immortalized in these high-quality resin pieces, use these pics as an awesome starting point to find the perfect handmade design and a unique way to make your own resin jewelry.
We are obsessed with this simple take on dried flowers and seasonal flora. The clear resin backdrop really helps the colors to pop and you can also tailor this design to suit the change of the seasons too – from spring blooms to autumnal shades. Swoon.

Experimenting with color is another way to make your resin piece your own. Use white resin or black resin for the main piece and introduce a standout color for a statement that needs no introduction.

Get beachy peachy with this half and half idea. Made for warmer days and softer shades, we love the iridescent dream of blue meets silver flakes in this fabulous piece.

Why can’t everyday be a celebration? These confetti hoops put us right in the party mood.

Mother Nature knows how to gift us the prettiest accessories for our epoxy resin designs.

Take the ocean with you everywhere you go with these island life inspired pink shell earrings.

In keeping with those sea shanty vibes, we are also in love with this delicate lighthouse pendant made from resin. You can totally buy little trinkets and carvings and build a whole world within your resin pendant.

We are all about play here and that’s why we are head over heels with these kooky resin creations to slip on your finger.

Capture the flutter of a butterfly forever…

With a little pigment play and metal leaf, you can turn your ear lobes into the cosmos.


Mermaids, glitter, rainbows, pompoms – these are the kinds of vibe we need.


Upcycle an old watch and take the time to be inspired by the smaller things in life.
Which resin art pieces are inspiring you? We would love to hear all about your amazing creations. Share your ideas with us in the comments.
You might also like:
- 3 Easy Ways to Make Homemade Rose Water From Rose Petals
- An Easy Homemade Kombucha Recipe That Will Heal Your Gut
- DIY Face Mask- Put This On Your Face (and save some for a snack)
- 7 DIY Deep Conditioner Recipes That Will Transform Your Hair
- DIY Gifts That Are Just Gorgeous
- How To Make Hyaluronic Acid Serum at Home (Only 5 Ingredients)


 TOP
TOP


