IN THIS ARTICLE
Air dry clay home décor projects have been taking Instagram by storm for a solid year now, and there is a good reason why. Large brand name stores have been selling sculpted pieces for $$$. DIY home décor enthusiasts have turned to using air dry clay to create their own unique pieces for a small fraction of the cost.
I recently gave four different air dry clay projects a try and it was easy, fun and relaxing to do! The best part? There is no need to bake anything. All you need to create these projects is a bucket of Crayola Air Dry Clay (I purchased a 5lb. bucket off Amazon for $11 and it was plenty) and a few tools you probably already have around your home.

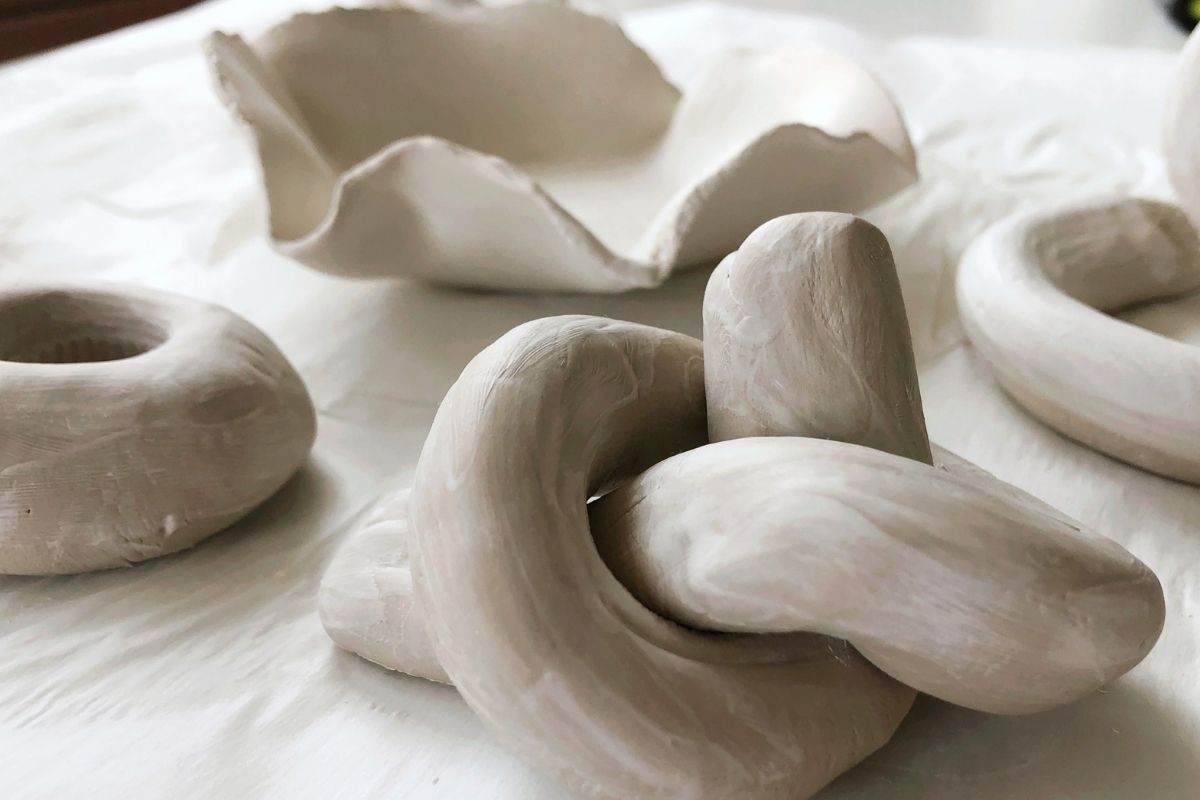
Clay Knot Sculpture

These cute little clay knots are really popular right now and fairly simple to make. They are a fun touch to any shelving or coffee table décor in your home. This took me a couple of tries to make, but once I got the hang of working with the air dry clay it was fairly easy.
Tip: You will need more clay than you think in order to create most of these projects.

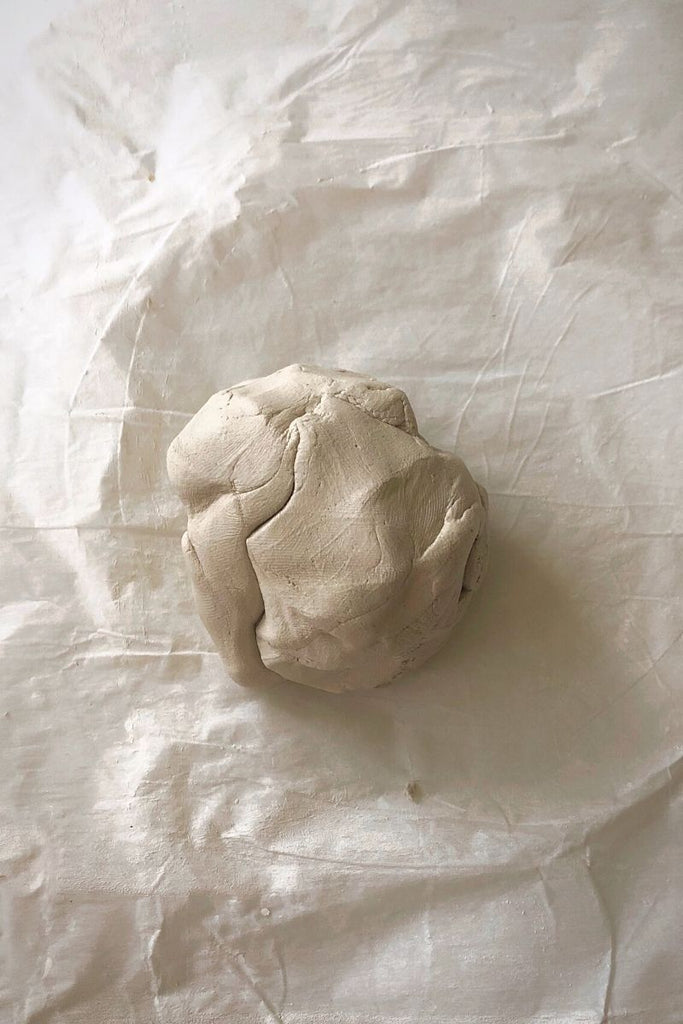
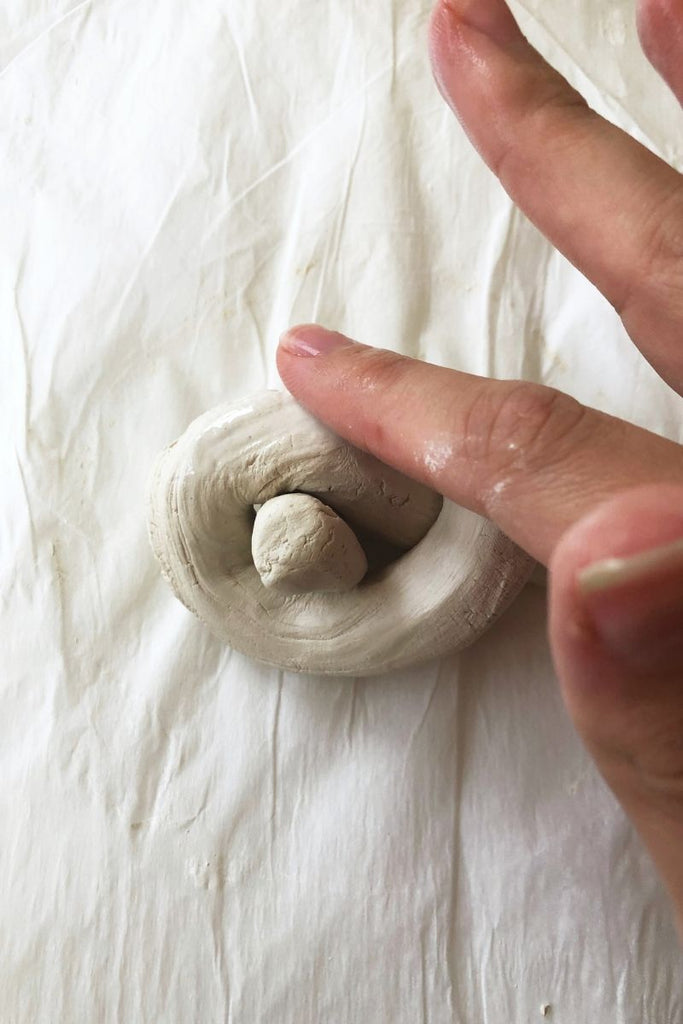
- Start with a handful of clay and begin to roll it between your hands to create a longer snake-like piece. Apply gentle pressure during this step so that the thickness of the piece stays even throughout. You only need to begin to form this shape, do not make it long or thin.
- Lay your newly formed piece of clay onto a smooth surface and use your hands to continue to roll it out. The piece should be about 1-1.5 inch thick and longer than you think you will need it to be in order to make the knot (your total length just depends on the size of knot you want to make). If you are having issues with cracking during this step, use a little water on your fingers to smooth them out and repair.
- Clean up the ends of your snake like piece by cutting them or rounding them out with a little water and twist your clay into a knot. There are all kinds of knots you can form with the air dry clay, but I chose to do a basic knot like the first step of tying your shoes.
- Smooth out any major imperfections with a tiny bit of water (too much water can cause cracks when drying) and leave it to dry for 3-4 days.
Clay Candle Stick Holders

This is probably the easiest thing I made and one of my favorites. These simple organic looking candle holders will add a touch of coziness to any space.

- Take a smaller amount of clay in your hands and roll it between your palms to form a ball. The clay ball should be slightly larger than a golf ball.
- Set the ball onto the table and use a candle taper or other object similar in size to press down into the clay ball (I used the top of an essential oil bottle, but I tested it by sticking it into one of my brass candle holders first to make sure it was the same size as a taper would be).
SHOP SOZY


Clay Dish
This clay project requires a few tools to make. You will need a rolling pin, a bowl or two, something sharp to cut the clay with and wax paper (parchment paper works as well). I made mine to use as a cute catch all dish on our night stand.
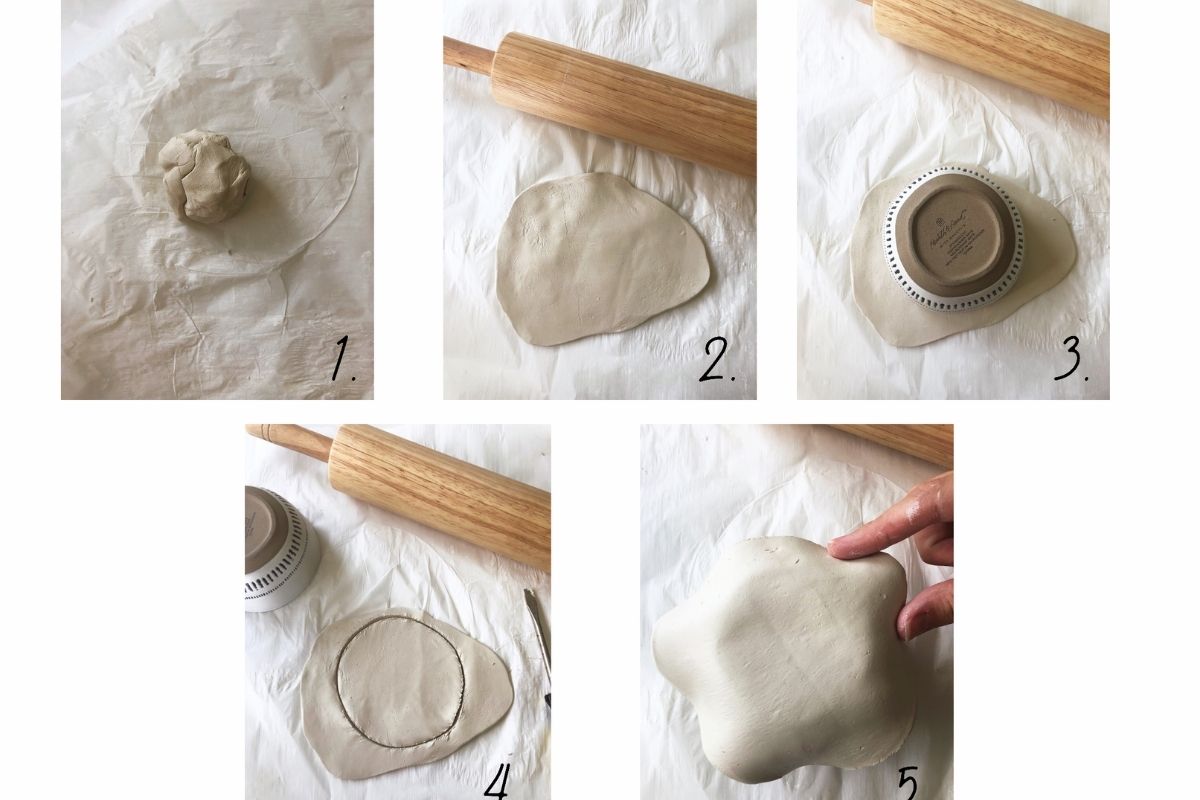
- Grab a handful of clay and lay it on a piece of wax paper. This will keep it from suctioning to your table or smooth work surface. Use a rolling pin to roll the clay out. Make sure that you do not go any thinner than 1/4 inch or you will end up with cracks in your dish as it begins to dry.
- Once your clay is rolled out grab a bowl and very gently set it upside down on your clay. If you press much the clay may end up suctioning to your bowl and be difficult to remove without starting over (ask me how I know).
- Lift the bowl away so that you see a faint circle in the clay. Use a sharp tool ( any kind of knife will do) and cut around the circle to make a circle out of your clay. To be honest I used a flat head screwdriver for this step and it worked fine.
- Flip your bowl upside down again and pick your clay circle up. Gently drape it over the bottom of the bowl. To give it a more organic look you can scallop the edges like I did by lightly pinching together the areas where the clay is not laying flat on the bowl. Leave it like this until it is fully dry.
Clay Bookends
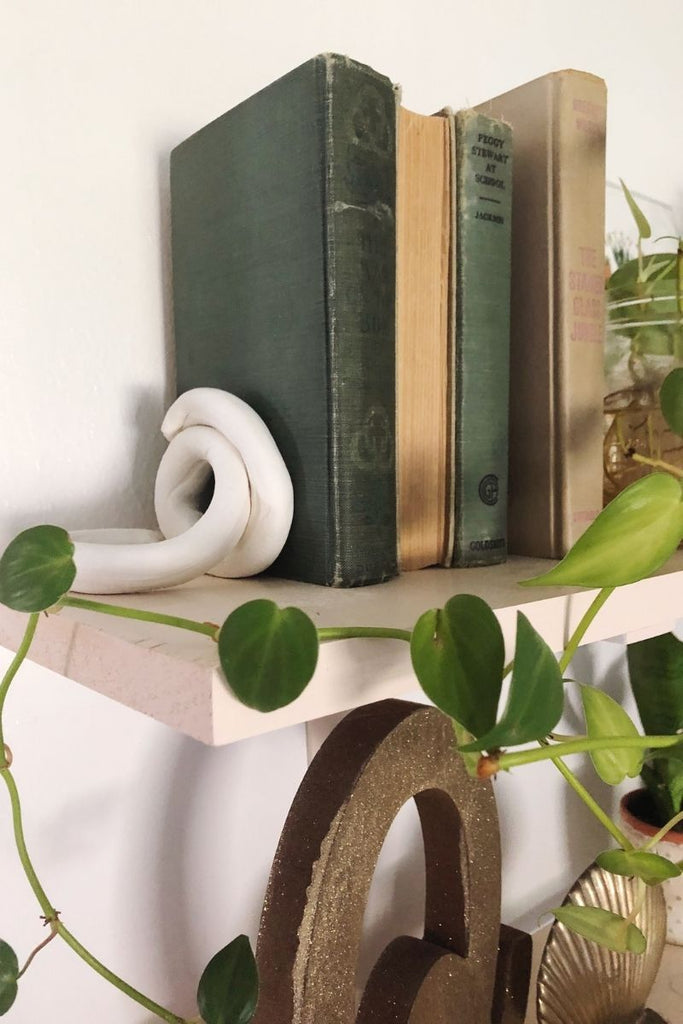
I probably should have made these slightly bigger, but they were so fun to do! There are many ways you can wind the clay around to create a bookend.
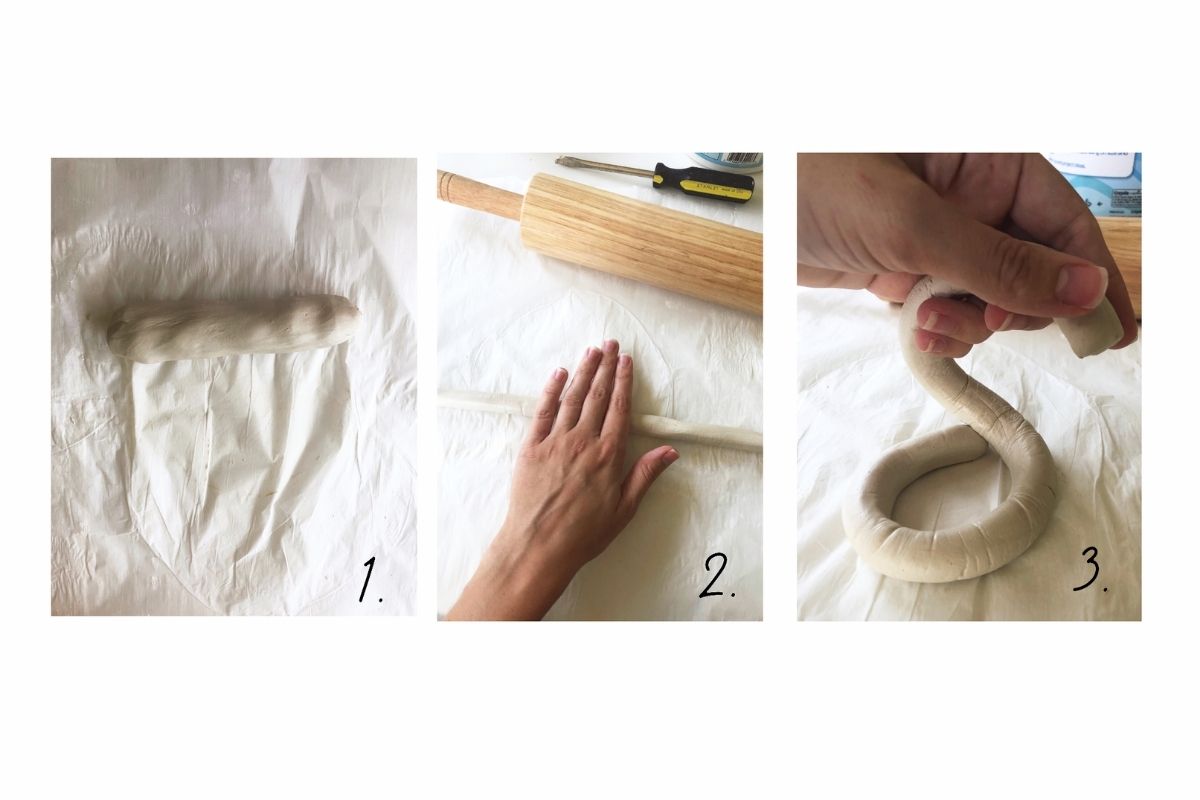
- Just like with the clay knot, you will grab a good size handful of clay and roll it between your palms to begin to form a snake like figure.
- After the shape has started to form, lay it on the table and use your hands to roll it out so that it is long enough to twist and coil. Make sure its size is even throughout to avoid any weak spots. Again- you will need this to be longer than you think.
- Pick the long clay rope up and start to twist it around in the shape you want. Work from the table up. My best advice is to go with the flow. There are so many ways you could twist the clay to form a l-shaped bookend. Once you are happy with the shape, smooth it out with a bit of water and let it dry for a few days.
What To Know About Air Dry Clay
What is Air Dry Clay?
Air Dry Clay is an earth clay with a mineral base, it's properties are similar to traditional clay. The biggest difference is that it does not need to be kiln dried to maintain its shape. There are several different types of clay and air dry clay should not be confused with polymer clay (oil-based compound) which is oven baked to dry, or modeling clay (polyvinyl chloride or plastic based) which is not designed to harden at all and should never be baked.
Air Drying Clay is great for beginners of all ages. Adults and younger kids alike will enjoy getting creative while working with air dry clay.
Does air dry clay break easily?
While air dry clay is not as durable as traditional kiln dried clay, it is not easily breakable. To avoid breakage make sure you do not sculpt it too thin and repair any cracks while working.
What is the best sealant for air dry clay?
One reason you may want to seal your air dry clay is that the clay does absorb moisture and can become soft again. A water based sealant like mod podge is a great option to seal your clay and avoid yellowing down the road. However if your clay project will be sitting on a shelf far away from water, then you do not necessarily need to seal it with anything.
Can you put liquid in air dry clay?
Yes. Water is used to smooth clay while working. Water can also be added to air dry clay to soften it back up (since it dries when it loses moisture). However if it is too soft it will need to sit while excess water evaporates before you can mold with it. If the clay is too wet it can cause cracking when it dries. If it is too dry it will be more difficult to work with.
You can also add in small amounts of tempera paint, acrylic paint, or food coloring to knead into your air dry clay before you begin your project.
How long does air dry clay last?
Air dry clay dries to touch in 24 hours of being left out and is completely dry after about 72 hours. The thicker your piece, the longer it will take to dry out. You can store excess clay in an airtight container for 3-12 months. If you notice that it is too dry to work with you can place it in a bag with a little water for a while to soften it back up.
DIY Homemade Air Dry Clay
This air dry clay recipe is a great alternative to store bought clay if you want to do a zero cost DIY. Chances are you already have all the ingredients in your pantry. It is similar to making homemade playdough or salt dough. But unlike salt dough, homemade "clay" has a nice bright, white color and smooth texture.
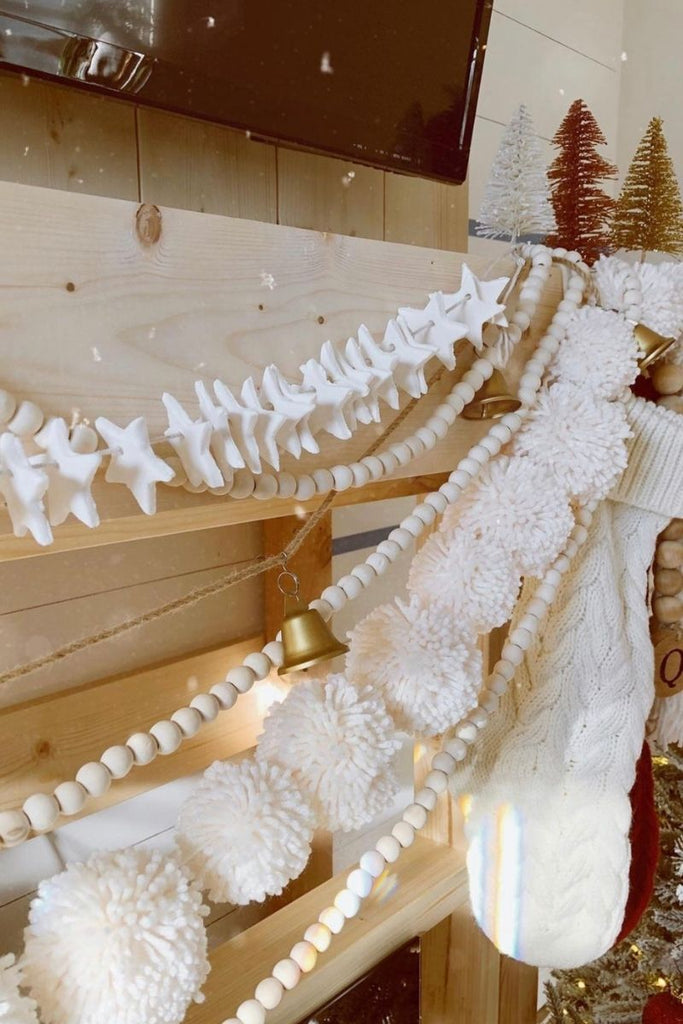
I have actually used this recipe once before to make a garland at Christmas last year and was very pleased with the results. I cannot speak to how it would be for creating larger clay sculptures, but it was perfect for rolling out and using a cookie cutter to create stars for a garland.
Recipe
- 2 cups baking soda
- 1 cup cornstarch
- 1 1/2 cups water

Instructions
- Add ingredients into a pot over medium heat.
- Mixing continually until a clay begins to form.
- Pull off the stove when most of the moisture is gone (thick mashed potato consistency) and let cool. You should be able to touch it without it sticking to you.
- Knead on a surface lightly dusted with baking soda until a nice smooth ball of clay forms that is no longer sticky.
I can't even begin to name all the things you can make with air dry clay. The list is practically endless, but if you need any more air dry clay ideas hop onto Pinterest and do a quick search for 'clay crafts' or 'air dry clay projects'. You can also check out YouTube for other helpful clay tutorials.
One of my favorite things about these projects are the little handmade imperfections that make them organic and unique.
What do you think? Would you make home décor yourself using air dry clay? Let us know in the VIP Sozy fb group!


 TOP
TOP